[Back to MIDI-Bash Page]
www.RomanBlack.com
My MIDI-Bash v2.0 Lap Drums
My first build of a MIDI-Bash drum controller... Updated May 19 2009.
Lap drums?
The first MIDI-Bash (v1.0) prototype was built on my MikroC development
board and worked fine, with 10 drum pads (buttons) and the UP and DOWN
buttons. I tested it playing the built-in drum sounds on my Roland
keyboard. PIC16F876 MikroC source code is provided at the bottom of this
page if you want to build a MIDI-Bash v1.0.
I decided to build "Lap Drums", my name for a little set of drums to
sit on my lap and play along with songs to work out the drum lines.
Like electronic "bongos" with 10 drum pads.
They would also be useful for recording, with the constraint of being
fixed velocity (volume). Fixed velocity suits me best for both tasks
as I don't need to worry about how hard I hit the pads and can just
concentrate on the timing, and also it is best for playing along with
songs as it is easier to hear both the song and the drums.
I added some features to make it version 2.0, mainly adding a volume
pot that controls the global MIDI velocity value for all 10 drums.
This means I can set a good listening volume without getting up, and
also allows for some expression when recording. The other feature
was to save the drum UP/DOWN config (ie which sound is on each drum
pad) to the PIC internal EEPROM so that it keeps the sounds setup
the same way when it is next turned on. I added another v2.0 feature
that lets you set each drum pad to its own velocity if desired.
The circuit
The circuit is very simple. 8 drum pads (buttons) connect to PIC portB.
Another 2 drum pad buttons connect to portC 2 and 3. The UP/DOWN buttons
connect to portC 1 and 0. The volume pot varies between +5v and 0v,
and connects to the only ADC input portA AN0. A drum LED flashes when
the unit is powered up and then each time a pad is hit. 4 pull-up
resistors are needed on the portC pins as portC does not have internal
pullups like portB.
See the source code for the PIC pin assignemnts etc.
There is a typical 5 volt regulator to provide +5v from a 9v battery.
The circuit is very low power and the battery lasts many hours, the MIDI
port only requires current when a pad is hit (and a MIDI note-on is sent).
So apart from the very small current through the 100k pot, the only
current really used is to power the 5v regulator and power the PIC
itself. I used a special low-current SMD 5v regulator (MC5209 5.0)
but even with a
typical 5v regulator it should give quite a few hours of constant use
before the battery gives out. Of course you can use a 9v DC plugpack
etc but I just wanted battery power so there is only one cable
connected (MIDI cable) when sitting on the lounge. :)

I kept the PCB as simple as possible for a quick easy construction
on 0.1" stripboard (veroboard). Only cut the tracks between the PIC
pins - use a 1/8" (3mm) drill bit and a very low speed drill or
just a handle. There are 2 solder blob jumpers on the bottom of
the PCB - see the blue lines. Also don't forget the wire link
under the PIC socket connecting the 2 PIC gnd pins.
I used a strip of conector pins and a connector so the PCB can
be easily removed from the unit, but you can just solder the wires
in if desired. Sorry about the poor quality of the JPG, I forgot
to convert it to a GIF and some of the writing got messed up -
whoever invented lossy compression needs to be shot. :(
Parts on PCB;
PIC16F876
28pin PIC socket
MC5209 5.0 +5v low power regulator (or use any +5v regulator)
2x 2.2uF tantalum caps - both sides of the 5v regulator
2.2uF tantalum cap - directly on the PIC power pins
0.001uF polyester cap - from AN0 analog input to gnd
3.3k SIL resistor pack - (or use 4 resistors) to pull-up portC pins to +5v
8MHz crystal with 2x 22pF ceramic caps (or a 8MHz 3pin package)
90 degree connector pins
Parts not on PCB;
9v battery connector - and 9v battery
on-off power switch
10 buttons - for the 10 drum pads
2 buttons - the UP/DOWN buttons
100k linear pot and knob - for "volume" pot
red LED and 1k resistor - for "drum" LED
5pin DIN panel socket and 2x 220 ohm resistors - MIDI out socket
Most of the parts values are not critical! I used 2.2uF tantalum caps
because they were handy. Any electros will do there, 10uF or 47uF etc.
For the 4 pullup resistors I used a 3.3k SIL pack (handy), but you can
use 4 standard resistors of just about any value; 1k, 10k, 100k will all
work fine. Likewise the cap on the ADC input AN0, I used 0.001uF
(again handy) but any cap under 1uF will work fine here. I used a 100k
linear pot to keep power consumption down, but 10k, 25k, 50k etc will
all work ok. I used a 1.5k LED resistor and a high brightness LED
to save power, you might want to use a cheaper LED and a 560 ohm or
1k resistor. The 2 resistors on the MIDI-out socket must be 220 ohms
each, this is required by the official MIDI specification.
Mechanical construction
I made it out of pine wood as I had some scrap pieces available and
the varnish etc from making other items for my studio. Wood is a nice
material that can be shaped and rounded to make comfortable lap drums.
For the pads themselves I had some small pieces of scrap 10mm thick
black perspex (acrylic). These would be hard wearing and not likely
to split from much bashing like thin wood might. And look pretty cool.
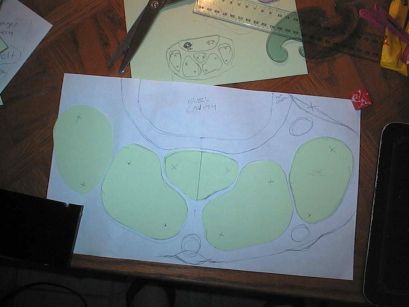
Pad design and position.
My pieces of 10mm black acrylic were some off-cuts and they were
limited in size and were wierd shapes, so I made cutouts from green
paper and tried a few shapes that might work for drum pads.
It ended up with 5 pads, each with 2 buttons on opposite sides to
give 10 drum pads total. Making the pads first in paper let me change
the shape to give good ergonomics, and then try drumming on it.
So the pads are positioned very well for 2 relaxed hands (thumbs
and fingers) to drum on any pads without moving much.

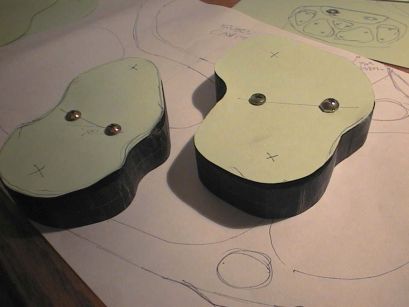
Cutting out the pads.
I drilled through 2 thicknesses of the 10mm acrylic and screwed them
together with a green paper template on the top, so that the 2 pads
would end up identical mirror-symmetric shape.
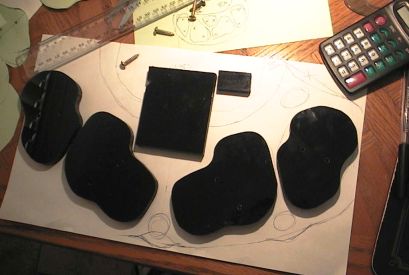
Shaping the pads.
They were cut on a bandsaw with a 6 tpi wood blade. Acrylic is a
similar hardness to wood. Then they were smoothed on a sanding disc
linisher and belt sander to give reasonably smooth edges. Later they
will get the top edge rounded and finished more smoothly.
Another mock-up test.
The pads were placed in posiiton on the backing template and played like
drums. Again this felt pretty natural. I decided on exactly where the
"sweet spots" were, ie the spots where the fingers liked to hit
the pads. These spots were marked, then the pads doubled up again and
the sweet spots drilled with a 10mm (3/8") hole in matching locations.
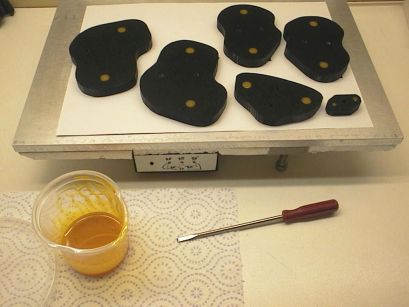
Permanently marking the sweet spots.
I put tape on the back of the holes to make them watertight and mixed up
some epoxy. Orange epoxy colouring was added and the epoxy was poured
in the little holes. This forms a hard plastic "dot" marking the sweet
spot and will remain permanent even when the pads are ground to a smoothed
shape later. These dots are important as they give you something to aim
for when hitting the pads. Especially when each pad has 2 buttons and
2 places to hit. I used my leveling hotplate to cure the epoxy for a
few days at about 45'C.
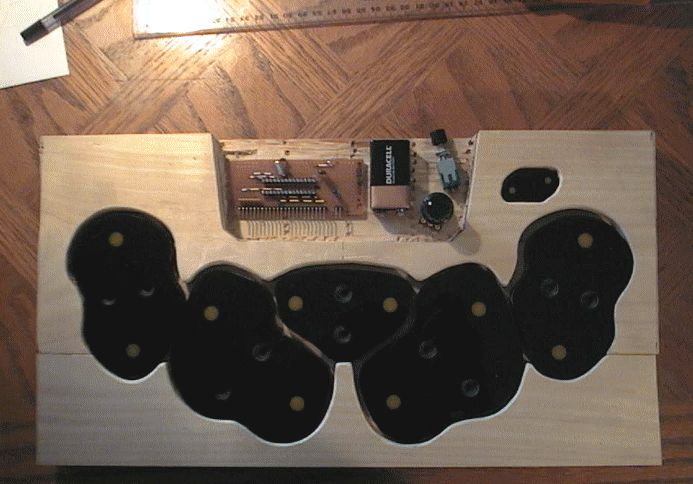
The Lap Drums build so far;
I cut some pieces of pine wood to make reliefs for the pads. Then I glued
the basic structure and chiseled a nice big cavity to hold the battery
and PCB.
Next I need to cut it nice and round, and do all the finishing and varnishing
of the wood, and finishing/rounding of the pads. It won't be square at
all when done, it will be oval in shape. I have had to put the project on
hold for a few weeks while as I'm too busy with commercial projects
at the moment to be messing with woodwork. :)
Using MIDI-Bash v2.0
It's pretty simple; you hit the pads and it sends MIDI messages to your
MIDI device that makes drum sounds. If you press the UP or DOWN button
while you hit a pad, that pad changes up/down to the next MIDI note
(to the next drum sound). So you can set any pad to play any sound.
All drum messages are sent out on MIDI channel 10, this is standard
for drum controllers.
However the new MIDI-Bash v2.0 features need some extra explaining;
v2.0 saves all the pad settings! After you change the drum
sound for any pad that setting is saved inside the PIC in its special
non-volatile EEPROM memory. The new settings are always remembered,
even if the PIC is turned off or the battery removed. So when you turn
it back on it will be set-up the same as the last time you used it.
This is great for battery use as it encourages you to turn it off/on
as much as you like (to save the battery). MIDI-Bash boots up instantly
so it's smart to turn it off even if its only a minute between
recording "takes" etc.
The "velocity" knob; turn this and you change the global
velocity (volume) of all the pads. So when sitting confortably you can
adjust the whole drum set louder/quieter like a normal volume knob
without needing to get up and mess with the MIDI device you are
controlling. This is great for playing along with songs, you can
adjust for loud or quiet passages without getting up.
Any pad(s) can be set to a fixed velocity! Normally ALL pads will
respond to the global velocity set by the knob. To set any pad(s) to a
fixed velocity; just hold down both the up/down buttons and hit
a pad. That pad will get "fixed" to the velocity that is currently set
(by the knob). After being fixed, it will no longer change velocity as
the knob is rotated. So you can set the same snare drum sound to 3 pads,
then set 3 different velocity levels for the 3 pads.
This is a very handy feature that is perfect for building drum patterns
where you want to accentuate certain drum hits with fractionally
different velocities, but where you want to have the security of all
the drum patterns using exact velocity values for the whole song.
I find this beats any other method of tapping-in drum patterns
including velocity sensitive pads or manually editing MIDI
note data later on the computer screen. Any drum pads set to a fixed
velocity are also saved and restored on the next power up. To return
any pad back to using the global velocity again; simply turn the
velocity knob right down and press both the up/down buttons and hit
the pad again.
The software!!
MIDI-Bash v2.0 Below is the complete and tested PIC 16F876
software for the "Lap Drums" seen above.
MIDI-Bash v2.0 features;
C source code for MikroC or other PIC C compiler.
10 drum buttons (normally open switch contacts)
2 up/down buttons to change the drum sounds
"Volume" pot control to set each drum volume (if desired)
Saves drum setup to eeprom so it remains after power-down.
SOURCE CODE; Click HERE for MIDI-Bash2.c 30kb
HEX FILE PIC 16F876 (not A); Click HERE for MIDI-Bash2.hex 30kb
(Source code is open source, use it as you wish but please mention me)
If you prefer a much simpler version;
MIDI-Bash v1.0 Also for 16F876, complete and tested.
MIDI_Bash v1.0 features;
C source code for MikroC or other PIC C compiler.
10 drum buttons (normally open switch contacts)
2 up/down buttons to change the drum sounds
SOURCE CODE; Click HERE for MIDI-Bash1.c 20kb
HEX FILE PIC 16F876 (not A); Click HERE for MIDI-Bash1.hex 30kb
(Source code is open source, use it as you wish but please mention me)
- end -
[Back to MIDI-Bash Page]