[Back to Home Page]

www.RomanBlack.com

MikroE SmartGLCD Module v1.5
I review the SmartGLCD 240x128 (version 1.5) PIC LCD module - 12th Oct 2011


History

I first wrote my original review of the SmartGLCD v1 in Feb 2011 (please read that as well if you are interested in the SmartGLCD). I also released some tutorials and projects using the SmartGLCD you can see here.

This is a review of the NEW SmartGLCD version 1.5, which MikroE recently released; MikroE.com web page for the SmartGLCD v1.5


What is it?

The SmartGLCD is a complete module with a powerful PIC 18F microcontroller on board, and a built-in graphics LCD and touchpanel!


The graphics LCD is 240x128 pixels (monochrome), black pixels on a background that can be any colour (as it has an RGB backlight LED).

The idea is that all you need to do is write some code, program it in the SmartGLCD and you have a working device that can do any complex task you like.

The SmartGLCD especially appealed to me as I do robotics, automation and machinery etc and it is an ideal controller for these tasks. It's LARGE graphics display is big enough (almost 5x3 inches) to be used on a machine and seen from a distance, and its full-sized touchpanel allows many onscreen controls including large industrial sized buttons for a gloved hand etc. Having display and touchpanel on board means there is no time lost connecting wires to displays or buttons etc!

MikroE also make smaller modules with full-colour LCD (which is nice) but the LCDs and touchpanel are small (like on your cellphone) and they use 3.3v power. The SmartGLCD is large and uses 5v power and a 5v PIC, and all its input/output pins are 5v and 25mA, making it more suitable for controlling "proper" machinery.


All new design! (Or v1 vs v1.5 shootout)

I'm a bit proud of this new second-generation SmartGLCD! This is because after my original review of the SmartGLCD v1 and my SmartGLCD Tutorials (where I discovered the SmartGLCD had 32k of usable static RAM on board), MikroE asked me to be an informal design consultant and provide suggestions for improvements on the new SmartGLCD model!

My original review of SmartGLCD v1 had criticised MikroE for not bringing out all the PIC pins to the solder headers, as this robbed the user of access to many of the PIC pins. MikroE have now made all (unused) PIC pins available on the pin header, and used a single row pin header on one side of the SmartGLCD, much more useful for plugging in to a breadboard or to a single industrial connector. Excellent!

The SmartGLCD v1 had a clumsy assortment of dual row and single row connectors all over the place, (see comparison photos below);


Besides the obvious size difference, the v1.5 has all the connectors on the top edge of the PCB in one convenient place, apart from a small PSU connector on the bottom. The original SmartGLCD v1 had duplicated (and redundant) connectors, and still did not bring out all the PIC pins to connectors. The v1.5 PCB is now a greatly improved design for including the SmartGLCD as the "brain" in a complete application.


MikroE added an onboard reset button (as I had asked in my original review) as this is great both when testing code and using the bootloader!

After quite a few back and forth emails, they also agreed to upgrade the PIC size from the 18F8527 to the 18F8722, basically the same PIC, but now with 128k ROM(!) instead of the 48k ROM as seen in v1. Excellent! This will now do SERIOUS industrial apps like PLC machinery controllers.


New USB on board!

Another great addition was to include the USB adapter on board, so the SmartGLCD v1.5 now can be plugged via USB directly into a PC or laptop and download code via the bootloader. It used to require a $10 USB adapter board, but now the SmartGLCD v1.5 includes this feature onboard so the USB cable plugs straight in.


It's not just for bootloader use! The USB port uses a FT232 USB->serial converter chip onboard the SmartGLCD, which lets you use all sorts of bidirectional serial data transfer between SmartGLCD and PC, using the simplicity and ease of the standard PIC USART.

This allows many options like datalogging, file transfer, and loading of PLC programs etc, making the SmartGLCD ideal as a machine controller with either permanent PC or occasional PC connection.


Other changes

One other change I suggested was to change from 1/8" mounting screw holes to 4mm mounting screw holes. This better suits "industrial" touch panel use with the larger stronger screws, and compatbility with standard metric and imperial PCB standoffs in the most popular sizes.

There are other improvements like an overall reduction in PCB size, making the compact module even more compact.

Also MikroE added a connection to the onboard 3.3v regulator (which is used for the MicroSD card socket) so now you can use the SmartGLCD to generate a low-current source of 3.3v for an external interface IC or 3.3v sensor. I checked the onboard regulator, which is an A8805 which can supply a significant 600mA of current at a regulated 3.3v, a very useful output!

The SmartGLCD v1.5 has also upgraded from a 8MHz to a 10MHz resonator for the PIC, allowing the full PIC speed of 40MHz now. As before the resonator has been cleverly tacked to 2 solder pads on the bottom of the board where it can very easily be replaced with a xtal (for more precise timing) or a xtal of a different frequency if that is needed.

A tiny 2-pin screwdown connector has been added at the botton edge of the PCB, for the 5v/Gnd power wires. Personally I prefer solder connections or header pins, but some people may appreciate the screwdown terminals for the 5v PSU.


Things removed?

Not much really. The SmartGLCD v1 had a couple of extra connectors so it's touchpanel, LCD and RGB backlight LEDs could be controlled from an external microcontroller, which seemed silly as it has such a powerful PIC on board already connected to theose features!

Those connectors have been removed, along with a tiny dipswitch on the back of the PCB that selected internal/external control of the RGB backlight LEDs. These are all logical improvements, and there is no loss I think.


Things they could have added?

I tried, (I really did) to talk MikroE into putting a tiny beeper onboard but alas they did not due to reasons of space and a lack of demand.

I soldered a beeper to my SmartGLCD v1 months ago, as I think it is great to hear tiny "bleep" "bloopbloop" noises when pressing controls on the touchpanel. That gives a pleasant (and functional) level of feedback to the user. (See below);


Even though they did not add the piezo beeper it is VERY easy to add yourself, as you can see above I just soldered 2 beeper pins to 2 PIC port pins, and this will work fine on the SmartGLCD v1.5 as well, and will only take you a minute to do. And of course is fully removable anytime! So as omissions go, this is an easy one to add yourself! ;)


The SmartGLCD v1.5 review

Hmm... Well since I loved the SmartGLCD v1 and MikroE have nicely added all the cool stuff I wished for, or could have wished for, well the review of v1.5 is pretty positive!

Rather than repeat all the same things I said before, I'll ask you to please read my original review of the SmartGLCD v1 and the content below will try to focus on the new v1.5 features.


Features

The SmartGLCD v1.5 contains a PIC 18F8722 microcontroller, which has;
  • 128 kbytes ROM (used to be 48 k!)
  • 3936 bytes RAM
  • 1024 bytes EEPROM
  • 16 ADC channels
  • 2 MSSP (I2C or SPI ports)
  • 2 EUSART (serial ports)

    The SmartGLCD has these hardware features as standard;
  • Large 240x128 pixel B/W graphics/text LCD (almost 5" x 3" in size)
  • Colour RGB LED backlight can light up the screen any colour
  • Full-screen touchpanel lets you draw on screen or press "virtual controls" on screen
  • USB socket and onboard FT232 USB->USART converter makes USB easy!
  • MicroSD Card socket lets you plug in memory cards
  • ICSP port so you can program the PIC with your favourite PIC programmer
  • Internal bootloader so it can be programmed with a USB lead (in the field or if you have no programmer)
  • All available PIC port pins brought out to a convenient single row header
  • 32k static RAM chip with 24k or more free for you to use (see my tutorials )
  • Reset button
  • Micro 3.3v regulator output pin, to power external 3.3v senors or ICs etc (600mA max)


    About some of the features

    MicroSD card socket. This was included on the SmartGLCD v1 and again on the v1.5, and is a very powerful feature that lets you use a multi-Gigabyte SD card as a storage device for the SmartGLCD to write to or to control the SmartGLCD from large files on the SD card.


    The MikroE compilers all have SD card support for most features like reading and writing data to the card and file creation. At this point the MikroC compiler I am using does not have functions to read the directories (FAT16) on the SD card, but I was easily able to get some code from the MikroE forum that provides decent FAT16 support. MikroE have said the new compilers should soon provide FAT directory support, and may do so by the time you read this. (Update) The MikroE Libstock.com site now has libraries for FAT16 and FAT32 support.

    I shouldn't have to say how great it is that the SmartGLCD has MicroSD card access already built in, as on any machine controller or robotics application this gives so many options!


    Big brother!

    The SmartGLCD v1.5 has the biggest baddest 8bit PIC ever made; the PIC 18F8722 with 128k of ROM. 128k is a crazy amount of ROM for an 8bit PIC! Not only will this hold massive applications but it is room for really industrial features like huge lookup tables, PLC and code interpreters, data for signal generation, etc.


    Datasheet for PIC 18F8722

    Make no mistake, 128k ROM on an 8bit PIC is BIG! This SmartGLCD is a SERIOUS tool... Not a toy. The PIC18F8722 has full 5v operation port pins, at 25mA sink and 25mA source.

    Also the SmartGLCD v1.5 still has the 62256 32kbyte static RAM chip I discovered in the SmartGLCD v1. With the GLCD using around 8k RAM, there is over 24k of static RAM available for user access there!


    Colour backlight

    Although the display itself is monochrome, the SmartGLCD v1 and v1.5 have a full-colour RBG backlight. Because of the large size of the LCD display the coloured backlight is ideal for machinery as it can signal run modes and fault modes etc from far away. The 3 RGB backlight LEDs are under individual control and are tied to 3 of the PICs PWM modules to automatically give you 30bit colour control in over a billion colours. I also wrote code to manually control the RGB LEDs to 0-255 resolution (giving 24bit colour; 16 million colours) which frees up some of the PIC hardware PWM resources for other uses- see; Tut06 - A 3-bargraph RGB LED PWM controller


    New USB socket

    This is not a pure USB socket but instead uses the popular USB->USART chip FT232B.

    This is easier in many ways as it lets you use the PIC internal USART module (standard serial) that most PIC users find easy to use. At the other end of the USB cable, the PC or laptop runs a free driver which you can download from FT here; FT drivers

    The whole setup emulates a good old fashioned "serial port" at both ends, so all your PC software that will work with com ports will now see the USB as just another com port. The advantage is that you get the simplicity of a serial USART at the PIC end (which most people are confident with) and what appears as just another "com port" at the PC end. The disadvantage is that you are restricted to typical serial port baudrates which is a little slower than pure USB, although still plenty fast at 115 kbaud or 250 kbaud.

    And of course if you want to transfer large amounts of data there is always the built-in microSD card socket!


    Manuals

    There are three PDF files you can download for the SmartGLCD v1.5. A user manual, a schematic and a pinout diagram. They are all available free from the MikroE.com web page for the SmartGLCD v1.5

    The user manual is much improved compared to the SmartGLCD v1 user manual, and now follows a similar format to the EasyPIC type manuals.


    Above is a shot taken from the pinout PDF. This gives you an idea of what can be connected to the SmartGLCD. All in all the manuals are good, although minimalistic, as the bulk of the operation of using the SmartGLCD is the PIC 18F8722 itself (so you really need that PIC datasheet PDF!).


    Just for the beginner...

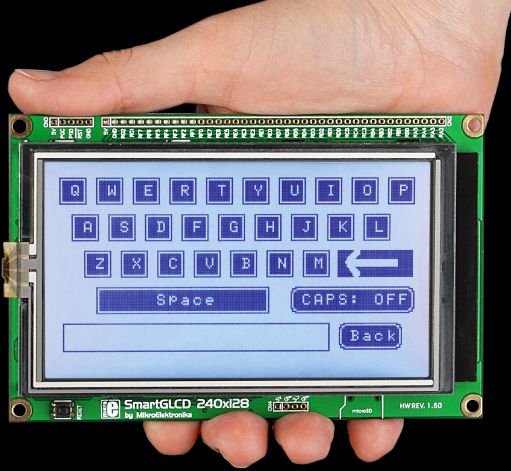
    Why do you need a SmartGLCD? Can you use an SmartGLCD? To me, it's very easy to use. It's one of my most preferred tools for when I quickly need to put together an application like a piece of specialised test gear. So I was surprised when one of my friends (who is an experienced programmer) expressed a worry that he might find the SmartGLCD difficult to use!

    It's easy to be a little overwhelmed looking at the SmartGLCD and think "I could never program that!" but it's actually very easy. If you have even a little bit of experience with PICs, you are probably familiar with the basic concepts.

    For example, to make a PIC flash a LED;
  • attach the LED to a PIC port pin.
  • then you write some code to make the PIC flash the LED.
  • then you use a PIC programmer to program the code into the PIC.
  • Success! A flashing LED.

    That is all pretty easy, and you can probably do it on a simple plug-in breadboard.

    Now imagine you want to make something a little more complicated, like a fishtank controller that keeps your fish at a happy temperature, and turns the lights on/off to simulate day and night cycles. This needs a display to set the temperature and set the times, menu buttons to operate it and do the setting, etc.

    Making a fishtank controller from scratch;
  • Design and make a PCB or solder up the circuit on stripboard.
  • Mount the display somehow.
  • Connect lots of wires between PIC and LCD, and a focus pot etc.
  • Mount a few buttons somehow to make a menu control.
  • Connect the buttons up with lots of wires.
  • Careful testing to make sure LCD and buttons are all wired right!
  • Connect the temperature sensor and lighting wire to 2 PIC pins.
  • Write come code.
  • Program the the code into the PIC.
  • Success! Happy fish. :)

    Now the same controller using a SmartGLCD;
  • Connect the temperature sensor and lighting wire to 2 header pins.
  • Write come code.
  • Program the the code into the PIC.
  • Success! Happy fish. :)


    To really put this into perspective, you should also consider the extra performance of the SmartGLCD compared to most hobby level projects. Its 80pin 18F8722 has a huge amount of spare pins and you can add lots of extra features to your fishtank controller later, upgrading features anytime you like! It has a BIG graphics LCD that can show a lot of info including graphic icons and charts. It has massive ROM memory to add features.

    It has a touchpanel, so you can make virtual buttons, slider controls etc as needed on the screen. And change them at any time with no more wiring needed! And it has handy features like the colour changing RGB backlight and USB cable to upload your last month's water temperature charts to your PC (or saves them to the SD card).

    So the ease of use of the SmartGLCD is excellent, provided of course that you can write the code to go in it.

    Fortunately the MikroE compilers are excellent for ease of use, with things like writing text to the LCD being very easy;
    // to write some text on the GLCD, positioned at the first char on line 4;
    T6963C_Write_Text("Fish are happy now!", 0, 4, T6963C_ROM_MODE_XOR);
    
    // to draw a filled in box (as a "button" on screen);
    T6963C_Box(0, 100, 19, 119, T6963C_WHITE);
    // Draws a filled-in box between the graphic coords x1,y1,x2,y2 and the box is filled in WHITE. 
    
    // read touchpanel, get x_coord and y_ccord;
    TP_Get_Coordinates(&x_coord, &y_coord);


    So as you can imagine it is really easy to draw text and boxes (buttons, icons etc) on screen, then read the touchpanel X and Y coords and depending where the user touched the screen (which button) your code performs different tasks.


    Above shows some very simple controls on screen that you can write in C code with very little effort. You can also include custom graphic icons and images quite easily (although they are not shown on the simple screenshot above). The graphics screen of 240x128 pixels is very large compared to typical "hobby" LCD displays and will also display 16 lines of 40 characters as text.


    Above shows a dual simultaneous spectrum analyser I quickly coded up on the SmartGLCD, for analysing spectral components of DTMF tones. The SmartGLCD is perfect for making test equipment like this! The SmartGLCD was used to prove that an analogue DTMF audio signal can be decoded with zero hardware, just using the SmartGLCD and the PIC's internal comparator (and a math algorithm). More info can be found in my DTMF decoding algorithm page.

    To make it easy for PIC users who have never worked with GLCDs etc I have written some tutorials that take you through the process of using your SmartGLCD including simple display and touchpanel examples, please have a look on my SmartGLCD tutorial page.


    Improvements needed on the SmartGLCD v1.5?

    Hmm, there's not much I would improve. The beeper would still be nice to have, but you can add one in a couple of minutes soldered onto a header pin.

    I think I would prefer a standard sized SD card socket instead of the microSD card socket, but MikroE told me this is a size issue which is easy to understand seeing how packed with chips the SmartGLCD is! Still for future revisions I would like a proper sized SD card socket, or what might be better still would be a header connector so a full size socket can be added externally (like on a machine front panel).

    Also, the price has gone up a bit! This is understandable with the addition of the onboard USB->UART (which was previously a $10 external product) and the SmartGLCD v1.5 also has the much larger PIC now compared to the v1. Of course I'd like the price as cheap as possible but considering it's ease of use to make powerful controllers (with no work other than code) the value for money is still pretty good. I'm also not sure how much the recent world currency fluctuations and the big drop in value of the US dollar may have affected pricing too, as the MikroE price is in US dollars which are now considerably smaller than they were 9 months ago...


    Overall?

    I liked the SmartGLCD v1, and I like the SmartGLCD v1.5 even more. If they just put that connector on for an external SD card socket, and a beeper, it would be perfect!

    I wish I had more of them... It's a little beauty.


    - end -

    [Back to Home Page]